2/24/11

Blog Giveaway!

To celebrate my new blog counter, I'm doing my first blog giveaway! I've got a batch of fun art supplies to give away including some sparkly glitzy watercolor paints, Ranger Distress Embossing Ink and an alcohol ink blending tool, Rub ons, some Tim Holtz embellies along with some sweet surprises!
To qualify, you must be a blog follower of Altered Underground. Once you've followed my blog, leave a comment after this post to let me know you want to be in the drawing! The giveaway will close on March 12 at midnight EST. I'll pick one follower at random and then post the winner. Of course, you'll have to email me your address so I can mail you your prize! Thanks for your support!

2/19/11

Think Pink

Even though Valentine's day was last Monday, I've been hung up on pink this week. Here is a fun tag I created to enter in this week's challenge on Simon Says Stamp and Show. 
Click photo to see it larger

I love to create hand made backgrounds, and this one was made on glossy card stock, with crayons and candles drawn across to create a resist. Then I applied re-inkers to a craft mat (a little drop will do ya), spritzed with water and pressed the paper into the wet paint. It's easy, fun and you get great effects.
I added scrapbook paper at the bottom from GCD Studios Cloisonne Collection and a strip on the side of another paper scrap whose identity was long ago used and removed. Then I stamped an image of a dreamy lady by Rubber Stampede, "Suzanne Nicoll." A German Scrap Pink Daisy border hides the join of the papers. I added a stamped image by Hero Art's "a bouquet of dreams" adhered to a brown scrap. Embellished with K and Company's bird chipboard (adhered with a pop dot), Prima flowers, a butterfly transparency by Recollections and a Rhinestone flower center by Prima. Finished off with an edging of Frayed Burlap Distress Ink by Ranger and some frou-frou ribbons.

I also made a pink collage about L O V E on canvas board. I used glimmer mists over a heart shaped mask from Tattered Angels and sprinkled on some Schmenke powder. It's from Germany, and its metallic powder which melts when it hits wet paint. So dreamy...I collaged playing cards which spelled out love, adding glimmer glam accents, pearl and rhinestone trims, tissue tape, a couple rub and some chip-board flourishes topped with Stickles. I'm still deciding if I should add some flowers, what do you think?

2/15/11

UFO's - My Latest Creation

I made a lot of goals for 2011. I've already told you about my goal to blog at minimum once a week. Another goal I made was to tackle my drawer full of UFO's (UnFinished Objects). Yes, I have a whole drawer full. I have others that are too big to fit in that drawer. I am proud to say that I have tackled two so far this year. Here is the latest one, a book I titled FLY AWAY.

I belong to an Art Club called MIABA. MIABA stands for MI Altered Book Artists. There are ladies from all over the state of Michigan and some even come from Ohio. We meet once a quarter in different locations around the state, but lately it seems like most often in West Michigan. It's hard to find people who are willing to host, and have the resources to do so. If you are interested in this group of artists, you can find more info on their Yahoo group.
Each time we meet, it seems like we start some really cool projects, but often don't get them finished. That's why they pile up. I'm trying to tackle them one at a time. The project I am sharing was started at our Sept. 2010 meeting, hosted by Christine. She gave us rolls of wallpaper and card-stock.  My template was shaped like a half arch. At the meeting I cut out the cardstock, glued the wallpaper on both sides using Tacky Glue and called it a day.

Here's what I did to the pages:
You can see the background starts with a taupe and cream wallpaper, it has orchid flowers and leaves on it. I used Bo-bunny Rub Ons, torn book pages spritzed with spray mists and a cool rubber stamp of arches that I colored with Ranger Distress Inks. Also, a variety of images scavanged from my collage box, scrapbook papers, some cool vintage stickers and a border. Easy!
This next background starts with Distress Inks rubbed over the wallpaper. You'd be suprised to learn that the ink adheres nicely to the vinyl wallpaper. More collage images, border, rub ons and a couple stickers. One thing I learned here is that Distress Crackle Paint will NOT adhere to vinyl wallpaper, it all flaked off.  You can see a few remnants of white on the left page in the background.
These pages have book pages, mica, stamped images, a transparency, a preserved leaf, some vintage images, a couple of stickers and more rub on's. I'm obsessed with rub ons!

The background for this set of pages was created by using a stencil and Glimmer Mists both from Tattered Angels Products. Collage images and rub ons finish it off.

Here's another set using Glimmer Mists and a mask created by a piece of radiator screening.

Here is the front and back cover, also created with Glimmer Mists, Tattered Angel and Crafter's Workshop Masks, rubber stamps and sticker letters. The End. Till next time.

2/11/11

My Painted Past

I belong to a variety of Yahoo Groups, mostly art related. It's a great way to see what others are creating, you get great tips and meet some nice folks. On one, rangerinklink, someone suggested we introduce ourselves. Most people talked about their lives and interests in art. After I posted mine, I thought, why not share that here? I'll throw in some pictures of art from my other decades. A nice trip down memory lane, right?
My journey started at a young age. My mother taught me how to draw when I was 6 and I enjoyed art through my public education days, finally studying art and design at Western Michigan University.
After graduating, I freelanced for many years, doing graphic design, pen and ink architectural drawings and watercolor paintings. This was "back in the day" of the Mall Art shows, where art groups would set up for a week and sell. As you can see from the not-so-great photos, I loved realism, detail, busyness.

Eventually I brought my work into local galleries. I began designing jewelry and painting clothes. I developed a watercolor technique on fabric which at the time was quite unique. I discovered that even though people enjoyed my realism, sales took off like crazy when I went more abstract, and free.

I sold at Art Fairs across the State of Michigan, in boutiques and eventually opened my own shop.
Remember the Bat Wing tops with matching pants?
The Art Fair Set Up
After two years, the sweet deal I had worked out with the landlord had disappeared and I decided to break away from art. Fairs and shows are like moving every weekend. It gets old eventually. Add in a divorce, and I decided it was time to get a real job. :-) what is that?


Watercolor cat on T-Shirt
After 7 years of avoiding Art, I got engaged and decided to make my own wedding invites. After many trips to rubber stamp stores and hours of work I found myself getting sucked back into the art world….now in a completely different Medium.

 I still work full time for an insurance company, but many hours are spent in my home studio creating altered books, collage, assemblage and on occasion do swaps like ATC's and Fat Books. I participate in 3 Art clubs and often teach.

2/2/11

Let's Talk Tape

Tissue Tape, Washi Masking Tape, Gaffer Tape...even colorful Duct Tape! Let's not forget the metal tape that is used in the heating and cooling industry. All of these tapes have a place in my artwork. Let's talk tape!
Tissue Tape
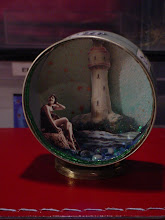
The idea for this discussion came about when I facilitated the Tattered Journey project last Saturday. It was recommended to cover the sides of the box or canvas with Tissue Tape, which gave the project a lovely finished look. The great thing about Tissue Tape is that you can use it to hide a variety of mistakes. I've always said, nothing in altered art isn't fixable. Use a cool vintage patterned tape to cover your oops's and it will look like you did it on purpose!

There is a challenge with Tissue Tape, stemming from the same thing that makes it wonderful. The tapes are repositionable. This is great because you can take the tape off and replace it until it's perfectly placed. This also presents a challenge because it makes your piece more fragile while you are still working on it. I discovered while wrapping the sides of my project that the tape would catch on my hands and fold over.
I decided to burnish the tape to the piece, which makes it stick better. For those of you who don't know what burnish means, it means to to make shiny or lustrous by rubbing. Now, we are not trying to make our tape shiny, but if you rub over the tape with a smooth object, like the back of a spoon or other smooth tool, and use gentle pressure (not tearing the tape) the tape edges will stay down better.

Another cool thing about the tape is you can apply ink to it, to change the look. I suggest Ranger's Distress Ink, which can be applied with your finger, direct from the ink pad, or even better by using a blending foam tool.

Gaffer Tape
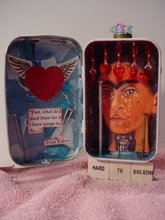
Gaffer Tape, is tape that is used in the theatre, television and movie industry to hold down cables, wires, anything that needs to be secured but will later need to be removed. It's made of fabric, usually cotton and is very strong. I don't use "real" gaffer tape, but tapes that are made by Seven Gypsies for us altered artists that are called gaffer tape. They have cool vintage patterns on them and work great for covering objects that have a dimensional surface.
I used Gaffer tape to cover a small wooden frame that I put on my Tattered Journey project. These tapes also have edges that can curl up, so gentle burnishing will help keep everything down. (very gentle or you'll wear the color off) They are repositionable, but you can't move them over and over because the adhesive begins to wear thin.

Foil Tape
Also known as Mastic Tape, it's used in the building industry to seal gaps in heating ducts. The brand I have is made by Nashua and was purchased at my local home improvement store for under $10. The roll is huge and should last quite a while. It's very fun to use in your art, so give it a try.

What to do with it, you ask?
You can color it with Alcohol Inks or Staz-on ink pads. You can emboss it in your Cuttlebug, Big Shot, Vagabond or other embossing machines. I suggest adhering it to cardstock or paper first, but it's not absolutely necessary. I used some in an altered book, and embossed it with a pencil and some other metal tools. I also placed some dimensional foam stickers underneath and got some raised designs that were cool.

Duct Tape
Everyone knows how creative you can be with Duct Tape. There are even contests for best prom attire made from Duct Tape.

I took a class from Shauna Swantek and we made a purse from Duct Tape and Cards. I actually used ATC's instead of playing cards. Here I used brown Duct Tape to create the rim of the bag. Loved the results!

Washi Masking Tape
Alas, I do not own any of this, but have heard from crafters who reside in the Orient how fun it is. Wide variety of colors and patterns. I imagine it's similar to Tissue Tape, but don't know for sure. I'm planning on ordering some from the internet soon so I'll report back when I know more.
That's all for this post, hope it wasn't to sticky for you to wade through it all! Blessings!