12/30/10

Tutorial: Tie Dyed Paper

All we are saying, is give peace a chance!  Whether you remember the 60's or not, tie-dye is an art form that lives on today. The other day I wondered if I could replicate the same effect on paper. I used to teach tie-dye to children in a community ed class, and we used big buckets with different colors of dye. I certainly didn't want to go that extreme, what a waste of materials. Here is what I came up with:

What you need:
* Dr. PH Martin's Radiant Concentrated Watercolors
OR Re-inkers (Like Ranger Adirondack inks) and eye droppers
* Fine Mist water spritzer
* A spritzing box to protect your work surface. Any corrugated box that is big enough will do. Mine was a flat box that can food cans came in.
* Pliable Paper - I used paper that a breakable item was wrapped in that I purchased at Hobby Lobby, it's not tissue paper but more like industrial weight paper towel. You could use any paper towel, napkins or preferably the kind you find on a roll in a rest-room (no stealing!)
* Rubber Bands
* Rubber gloves, if desired

I found that using a double thickness of the paper (two sheets together) worked best, you get more bang for your ink buck.
To begin, prepare your paper by bunching the paper into finger-shaped sections, and secure randomly with rubber bands.
They should resemble this. You'll want to leave some of the paper showing between the rubber bands where your color can seep in. Repeat this process until you have covered the majority of the paper with rubber band secured bunches.

Next, it's time to apply the color. I used Dr. PH Martin's Watercolors, they need to be shaken up to distribute the pigment. You won't need to do that if you use re-inkers. The eye dropper tip is a great way to apply the color without getting your hands messy. I recommend using rubber gloves or you'll have colorful hands if your not careful.
As you apply the droppers of color to each bunched section, spritz the area with water using your fine-mist spritz bottle. The colors will run into each other, but because the colors are so concentrated using the Dr. PH Martin's, or Ranger Re-inkers, they retain their color quality.

It's really fun to see how wild you can get the color combinations. Keep adding and spritzing. The more water you add, the farther the colors will spread. Once you get the amount of color you want applied, set the paper aside until it is half-dry. Inside, in heated conditions, this took about an hour for me.
It's wise to remove the rubber bands before the project is completely dry. This part can be tricky, I suggest removing them carefully to avoid tearing the paper. This is another reason that using a double thickness of paper works best, you have a stronger product. I ended up using some small, sharp scissors to cut the rubber bands off of some areas, by pulling the band away from the paper before snipping the rubber. After all the bands are removed, smooth the paper out and hang it with clothespins to dry completely.
You will want to iron the paper once it's dry. Use a low heat setting, being careful not to tear the paper. I really didn't have a lot of trouble with that, but if you had any previous tears you might make  them bigger.
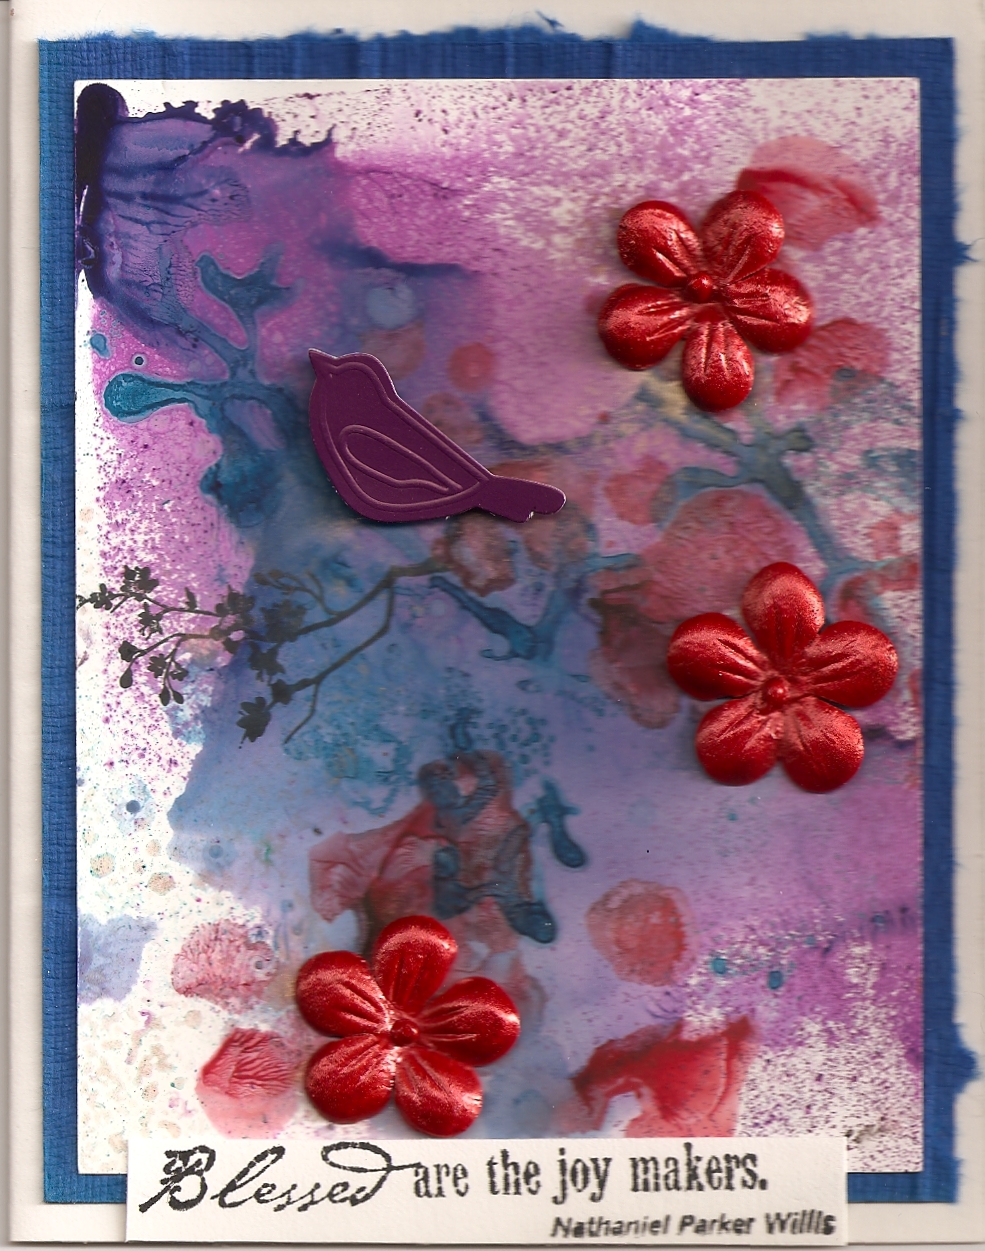
Here is another example of the finished product. This example is the one I tried in single thickness, which did have some tears in it. 

I applied sections of the paper to card-stock, using a glue-stick and a brayer to smooth it down. Now I can use it in my art work! This one reminds me of a Monet painting.
Thank's for checking out my very first tutorial. Leave me a comment if you have any questions. Blessings!

12/26/10

Had Yourself a Merry Little Christmas?

I hope you had a Merry Christmas, whether big or small. I had one of the best Christmas's in a long time. Why? Because it was fairly stress-free.  Hurrah! I decided to scale a lot of things back this year. I planned a quick and easy meal instead of feeling like I had to cook like Emeril. I made my scheduling plans around what was easier instead of trying to pack a lot in. I said no to a lot of activities that I would really have liked to attend, but decided to keep things more relaxed. It paid off. I feel really good about it (except for my tummy, I ate too much!)

Past Promises
I had said I would post some recent art and then it never showed up. Part was because I wasn't happy with my camera and part was because I wanted my website to look different. So here is my first attempt:
It's an altered file folder. I've been playing with mists and masks lately, using Ranger Adirondack sprays, Tattered Angel's mists, and some other glimmer mists. I also made this fun tag:
And this card of a bird on a branch, using glossy card stock and some dimensional embellishments.
I'll post more pictures soon, ta-ta for now! Be Blessed!