5/28/11

Paintings

I spent the last couple weeks doing some mixed-media pieces. Paint, collage, oil pastels, gel medium, mists and masks. Thought you'd enjoy looking them over. I'm struggling with deciding if a couple of them are finished or not.  I think we all struggle with this one.

Let me know your thoughts!

You can click pics for larger image
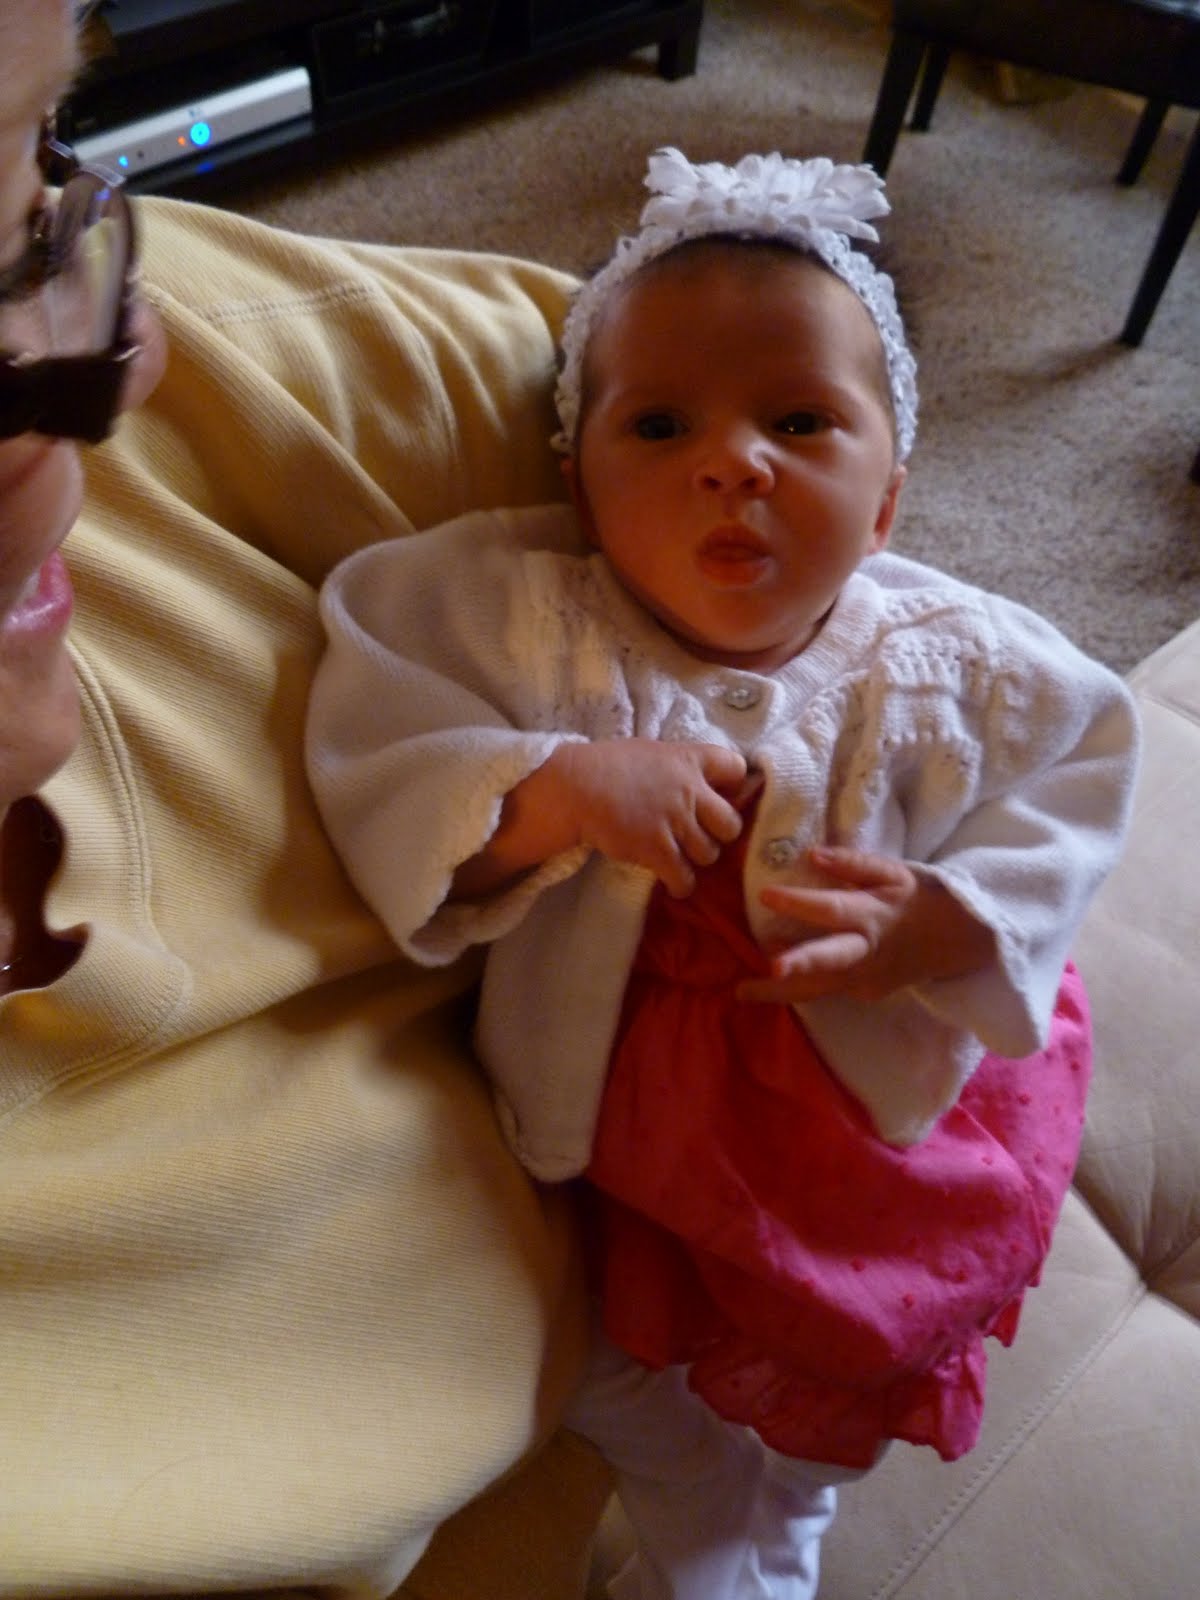
  I also had a new friend visit me this week. Her name is Reghan and she is truly a work of art!
Congrats Rita, Adam and Chi!


5/20/11

What a difference a day makes

I forgot to post this after I wrote it last week. Duh.

Old news but anyway, I'll share it cuz I took the time to write it.  I also finished up this week a piece for a friend who is getting married. I'll share it here:

Whew! Yesterday I became ill. It hit me out of nowhere and I ended up in urgent care.  I woke up at 5am with a weird neck ache, took some ibuprofin and went back to sleep.  Later, I got a 101.7 fever and chills, just couldn't get warm (it was 82 degrees here yesterday). Come to find out I have a lymph node infection. They put me on some meds that they give people who have been exposed to Anthrax (not the band).
I cannot remember the last time I felt that horrible. A day later, fever has been gone since last night and I feel better. Thankful!

5/1/11

Paper Stash - Kraft Resist Paper by Tim Holtz

I'll admit that I broke my resolution by missing a couple weeks posting. We were out of town for the last two weekends, and I was so obsessed with my current projects that I have not allowed time for my blog. Nevertheless, I am happy to be finished with one of my projects and am going to share it with you now.

I was chomping at the bit to play with some of my newest Tim Holtz toys, so I started working on a few tags using the Kraft Resist Paper titled "Paper Stash" from Tim's Idea-ology line.
The papers are a light weight kraft (think brown paper bag) card stock with embossed images already printed over the patterns. I could not find a weight on the information, but it is heavier than scrapbook paper, but lighter than 65 lb card stock. The patterns are very vintage and cool and coordinate well with the tissue tapes, stencils and stamps in the Tim Holtz line.
I began by using my Sizzix Movers and Shapers Tag and Bookplates Die. I cut several tags out on my Cuttlebug, from a variety of the Kraft Resist Papers. The die cut them very well, using two B plates to run through my machine.
I wanted to try a few background techniques to see how the paper would look. I started with the Distress ink onto the craft mat technique, rubbing a few pads onto the the craft mat and spritzing the ink with a fine spray of water. Then I pressed the tag face into the ink and dried with a heat gun, repeating the process until I was satisfied with the results. At first I was disappointed because when the paper got wet you could not see the color. Once it dried you could definitely see the color as well as the cool resist patterns of the paper. I will caution you that when you get this paper wet it curls and waves. I placed the dried tags under a book overnight and this solved the dilemma.
Here is a cute tag I finished that used that technique:

You can really see the resist pattern behind the image of the stamped princess, and the yellows and oranges of the ink I applied to the paper. I embellished with Tim's "Cherish" Philosophy Tag, grunge shapes, a flower and a Jolie's 3d fleur dis lie sticker.
Here is another tag with the Distress Ink technique which was finished with Tim Holtz Stampers Anonymous cling mount stamps, Salvage Sticker, Leather "W" embellishment and vintage image.

I also used Tattered Angels Glimmer Mists over some of Tim Holtz' Advantus mini-masks to get a background with areas where the Kraft Paper showed through. The mists worked great on the paper, but as with the Distress technique, I had to weight the dried tags down to flatten them back out.
 Tissue Tape and ribbon flowers, rubber stamps and vintage images create my "Time flies" tag.
This one is adorned with Tim's Stamps, Salvage Sticker, Adage Ticket, Mini-Rosette, vintage image, Idea-ology light bulb altered with Ranger alcohol ink, Trinket Pin and Sprocket Gear.
This is another spritzed tag but I added oil pastels to highlight the background over the dried ink. I added vintage images, Tim Holtz Salvage Sticker, mini-rosette, Tim Stamps, rub-ons and topped it off with a rhinestone, button and Crystal Accents over the heart.

4/8/11

Studio Tour

A while back I promised pics of my studio area, which is usually in one of two states. Cluttered or severely organized. I hate to admit it, but my creativity flows best in a messy room. Go figure? But I am also forced to confess that I have an organizer living inside of me and it has to come out to play every now and then, or I'm just not happy.
So this is evidence that the organized Lori recently came out to play. Soon, I'm sure, she will be off on an extended vacation and Lil' Miss Messy will happily create herself into a big pile of precious papers.
 This is my fabulous and free desk. My hubby's company bought all new furniture and he was asked if I might want the reception desk. Ummmm...that was a hard decision! It was really a God thing, because we had already bought a desk for our office things which sits in the far right corner. When we got this desk home, it fit perfectly (no space left) right up against the existing desk. Not an inch to spare, but it worked! Score!
You can see where I've added in some storage blocks, rolling carts etc. I like them because they can be moved around as my organizing whim takes me. The one on the left contains finished projects and UFO's. The one on the right contains my dimensional embellishments, mailing supplies and a drawer of ribbons and yarns. (They are sorted by colors in baggies).
This is the area to the left of my desk, it houses my machines. Cuttlebugs, Xyrons, Zutter and Punchinator. I also have a cool ribbon rack and some XL rubber stamps stashed here.
 Next there is a closet. To the left of that sits this book case. It contains my bead and jewelry supplies, paper ephemera, assorted art papers, Canvases and sorted art supplies. I keep my paints in a glass case which I didn't include a picture of.
This cart contains my mounted rubber stamps. Most of them, anyway. I have a stamps in a lot of different bins and drawers, unmounteds are in a basket. Behind this is another bookcase, containing my Somerset Studio Magazines, books and my mist paints. Bins of fun things I've collected for assemblage work and some chotchkies. If you are wondering where the azure blue wall color decision came from, originally it was chosen to coordinate with a  lot of sports artwork which belongs to my husband, Matt. Slowly it has migrated away as my supplies have grown. Good thing for me he is cool with it.
Last but not least, we have my studio mascot, Congo. He usually pesters me while I work. The other day I put this cat cubby on this shelf, just for a few minutes while I was straightening. It usually sat on the floor. He wouldn't sit on it there, but now it's his favorite spot in the house. Cats! So much fun. Hope you enjoyed my mini tour.

4/3/11

Tag, you're it!


 I've had a weird couple of weeks, not feeling the best and busy with a variety of things so not much artsyness has happened. In a few stolen moments, I did manage to get some art therapy in. I thought I'd share some more UFO's today, that I finally did finish. (unfinished objects)
These tags were created using Ranger Color Wash Sprays, Tattered Angels Glimmer Mists and Radiant Rain sprays. I used a variety of masks for the backgrounds. Each one is finished off with a vintage image of a woman, rub-ons, German Scrap, and fun embellishments. Tags finished with a ribbon or yarn topper. The Asian one also has beaded fringe at the bottom.
This one starts off the same, background created with spray mists and masks, vintage image of a showgirl and some Tim Holtz Tissue Tape, an Adage Ticket, a Heidi Swapp stamped image of lace, a Paula Deen Bird embellie and some Prima Flowers. Hope they remind you of spring.

3/20/11

Week off

I took last week off from art. It wasn't planned, I just didn't feel inspired and I got sucked into being "relaxed". Who am I kidding, I was just lazy. I did work yesterday on some ongoing projects but I don't have much new that is finished to share.
I decided that I would put up the photos of the Glass Bottle Snowmen that I made last December, but never shared.  It's an homage to spring, really, since snowmen have to migrate north this week. Sorry guys, but we won't see you again until next winter. Don't forget to write!
These smiling fellows (and ladies) are made from glass bottles, Crayola Air dry clay, Vintage Bead noses, bead eyes, brads for smiles and assorted fillers that look wintery. I created hats from bottle caps, discarded metal findings and beads.
We made these at our art club at Stamp Therapy and everyone's took a distinct look based on the builder's style. They were inspired by the December 2008 cover of Cloth, Paper, Scissors.
You can see on this close up where I added some distress ink to the cheeks to give our dapper couple some personality. Faux fur wrap gives the lady some added warmth.

This photo features the tallest snow people I made. The regal lady is filled with vintage beads and sports a brooch (missing a couple stones). Her hat is made from a cork and embellished with a fancy brad. We filled the bottles with tinsel, little styro snowballs, strings of pearls, glitters and crystals. Each one a little treasure. I honestly couldn't part with a single one of them, but maybe next year....

3/13/11

Drum roll....winner is picked!


Blogger Vic said...
Fun! Who doesn't love a giveaway? LOL I became a follower. And Vic was picked because her number was randomly drawn from a coffee cup containing all 46 followers who commented by the deadline. So Vic, send me an email or post so I can get your address and send your box of fun off to you! I'll do this periodically because it was fun and I do love making new friends. Thanks again to everyone who supported me!

2/24/11

Blog Giveaway!

To celebrate my new blog counter, I'm doing my first blog giveaway! I've got a batch of fun art supplies to give away including some sparkly glitzy watercolor paints, Ranger Distress Embossing Ink and an alcohol ink blending tool, Rub ons, some Tim Holtz embellies along with some sweet surprises!
To qualify, you must be a blog follower of Altered Underground. Once you've followed my blog, leave a comment after this post to let me know you want to be in the drawing! The giveaway will close on March 12 at midnight EST. I'll pick one follower at random and then post the winner. Of course, you'll have to email me your address so I can mail you your prize! Thanks for your support!

2/19/11

Think Pink

Even though Valentine's day was last Monday, I've been hung up on pink this week. Here is a fun tag I created to enter in this week's challenge on Simon Says Stamp and Show. 
Click photo to see it larger

I love to create hand made backgrounds, and this one was made on glossy card stock, with crayons and candles drawn across to create a resist. Then I applied re-inkers to a craft mat (a little drop will do ya), spritzed with water and pressed the paper into the wet paint. It's easy, fun and you get great effects.
I added scrapbook paper at the bottom from GCD Studios Cloisonne Collection and a strip on the side of another paper scrap whose identity was long ago used and removed. Then I stamped an image of a dreamy lady by Rubber Stampede, "Suzanne Nicoll." A German Scrap Pink Daisy border hides the join of the papers. I added a stamped image by Hero Art's "a bouquet of dreams" adhered to a brown scrap. Embellished with K and Company's bird chipboard (adhered with a pop dot), Prima flowers, a butterfly transparency by Recollections and a Rhinestone flower center by Prima. Finished off with an edging of Frayed Burlap Distress Ink by Ranger and some frou-frou ribbons.

I also made a pink collage about L O V E on canvas board. I used glimmer mists over a heart shaped mask from Tattered Angels and sprinkled on some Schmenke powder. It's from Germany, and its metallic powder which melts when it hits wet paint. So dreamy...I collaged playing cards which spelled out love, adding glimmer glam accents, pearl and rhinestone trims, tissue tape, a couple rub and some chip-board flourishes topped with Stickles. I'm still deciding if I should add some flowers, what do you think?

2/15/11

UFO's - My Latest Creation

I made a lot of goals for 2011. I've already told you about my goal to blog at minimum once a week. Another goal I made was to tackle my drawer full of UFO's (UnFinished Objects). Yes, I have a whole drawer full. I have others that are too big to fit in that drawer. I am proud to say that I have tackled two so far this year. Here is the latest one, a book I titled FLY AWAY.

I belong to an Art Club called MIABA. MIABA stands for MI Altered Book Artists. There are ladies from all over the state of Michigan and some even come from Ohio. We meet once a quarter in different locations around the state, but lately it seems like most often in West Michigan. It's hard to find people who are willing to host, and have the resources to do so. If you are interested in this group of artists, you can find more info on their Yahoo group.
Each time we meet, it seems like we start some really cool projects, but often don't get them finished. That's why they pile up. I'm trying to tackle them one at a time. The project I am sharing was started at our Sept. 2010 meeting, hosted by Christine. She gave us rolls of wallpaper and card-stock.  My template was shaped like a half arch. At the meeting I cut out the cardstock, glued the wallpaper on both sides using Tacky Glue and called it a day.

Here's what I did to the pages:
You can see the background starts with a taupe and cream wallpaper, it has orchid flowers and leaves on it. I used Bo-bunny Rub Ons, torn book pages spritzed with spray mists and a cool rubber stamp of arches that I colored with Ranger Distress Inks. Also, a variety of images scavanged from my collage box, scrapbook papers, some cool vintage stickers and a border. Easy!
This next background starts with Distress Inks rubbed over the wallpaper. You'd be suprised to learn that the ink adheres nicely to the vinyl wallpaper. More collage images, border, rub ons and a couple stickers. One thing I learned here is that Distress Crackle Paint will NOT adhere to vinyl wallpaper, it all flaked off.  You can see a few remnants of white on the left page in the background.
These pages have book pages, mica, stamped images, a transparency, a preserved leaf, some vintage images, a couple of stickers and more rub on's. I'm obsessed with rub ons!

The background for this set of pages was created by using a stencil and Glimmer Mists both from Tattered Angels Products. Collage images and rub ons finish it off.

Here's another set using Glimmer Mists and a mask created by a piece of radiator screening.

Here is the front and back cover, also created with Glimmer Mists, Tattered Angel and Crafter's Workshop Masks, rubber stamps and sticker letters. The End. Till next time.

2/11/11

My Painted Past

I belong to a variety of Yahoo Groups, mostly art related. It's a great way to see what others are creating, you get great tips and meet some nice folks. On one, rangerinklink, someone suggested we introduce ourselves. Most people talked about their lives and interests in art. After I posted mine, I thought, why not share that here? I'll throw in some pictures of art from my other decades. A nice trip down memory lane, right?
My journey started at a young age. My mother taught me how to draw when I was 6 and I enjoyed art through my public education days, finally studying art and design at Western Michigan University.
After graduating, I freelanced for many years, doing graphic design, pen and ink architectural drawings and watercolor paintings. This was "back in the day" of the Mall Art shows, where art groups would set up for a week and sell. As you can see from the not-so-great photos, I loved realism, detail, busyness.

Eventually I brought my work into local galleries. I began designing jewelry and painting clothes. I developed a watercolor technique on fabric which at the time was quite unique. I discovered that even though people enjoyed my realism, sales took off like crazy when I went more abstract, and free.

I sold at Art Fairs across the State of Michigan, in boutiques and eventually opened my own shop.
Remember the Bat Wing tops with matching pants?
The Art Fair Set Up
After two years, the sweet deal I had worked out with the landlord had disappeared and I decided to break away from art. Fairs and shows are like moving every weekend. It gets old eventually. Add in a divorce, and I decided it was time to get a real job. :-) what is that?


Watercolor cat on T-Shirt
After 7 years of avoiding Art, I got engaged and decided to make my own wedding invites. After many trips to rubber stamp stores and hours of work I found myself getting sucked back into the art world….now in a completely different Medium.

 I still work full time for an insurance company, but many hours are spent in my home studio creating altered books, collage, assemblage and on occasion do swaps like ATC's and Fat Books. I participate in 3 Art clubs and often teach.

2/2/11

Let's Talk Tape

Tissue Tape, Washi Masking Tape, Gaffer Tape...even colorful Duct Tape! Let's not forget the metal tape that is used in the heating and cooling industry. All of these tapes have a place in my artwork. Let's talk tape!
Tissue Tape
The idea for this discussion came about when I facilitated the Tattered Journey project last Saturday. It was recommended to cover the sides of the box or canvas with Tissue Tape, which gave the project a lovely finished look. The great thing about Tissue Tape is that you can use it to hide a variety of mistakes. I've always said, nothing in altered art isn't fixable. Use a cool vintage patterned tape to cover your oops's and it will look like you did it on purpose!

There is a challenge with Tissue Tape, stemming from the same thing that makes it wonderful. The tapes are repositionable. This is great because you can take the tape off and replace it until it's perfectly placed. This also presents a challenge because it makes your piece more fragile while you are still working on it. I discovered while wrapping the sides of my project that the tape would catch on my hands and fold over.
I decided to burnish the tape to the piece, which makes it stick better. For those of you who don't know what burnish means, it means to to make shiny or lustrous by rubbing. Now, we are not trying to make our tape shiny, but if you rub over the tape with a smooth object, like the back of a spoon or other smooth tool, and use gentle pressure (not tearing the tape) the tape edges will stay down better.

Another cool thing about the tape is you can apply ink to it, to change the look. I suggest Ranger's Distress Ink, which can be applied with your finger, direct from the ink pad, or even better by using a blending foam tool.

Gaffer Tape
Gaffer Tape, is tape that is used in the theatre, television and movie industry to hold down cables, wires, anything that needs to be secured but will later need to be removed. It's made of fabric, usually cotton and is very strong. I don't use "real" gaffer tape, but tapes that are made by Seven Gypsies for us altered artists that are called gaffer tape. They have cool vintage patterns on them and work great for covering objects that have a dimensional surface.
I used Gaffer tape to cover a small wooden frame that I put on my Tattered Journey project. These tapes also have edges that can curl up, so gentle burnishing will help keep everything down. (very gentle or you'll wear the color off) They are repositionable, but you can't move them over and over because the adhesive begins to wear thin.

Foil Tape
Also known as Mastic Tape, it's used in the building industry to seal gaps in heating ducts. The brand I have is made by Nashua and was purchased at my local home improvement store for under $10. The roll is huge and should last quite a while. It's very fun to use in your art, so give it a try.

What to do with it, you ask?
You can color it with Alcohol Inks or Staz-on ink pads. You can emboss it in your Cuttlebug, Big Shot, Vagabond or other embossing machines. I suggest adhering it to cardstock or paper first, but it's not absolutely necessary. I used some in an altered book, and embossed it with a pencil and some other metal tools. I also placed some dimensional foam stickers underneath and got some raised designs that were cool.

Duct Tape
Everyone knows how creative you can be with Duct Tape. There are even contests for best prom attire made from Duct Tape.

I took a class from Shauna Swantek and we made a purse from Duct Tape and Cards. I actually used ATC's instead of playing cards. Here I used brown Duct Tape to create the rim of the bag. Loved the results!

Washi Masking Tape
Alas, I do not own any of this, but have heard from crafters who reside in the Orient how fun it is. Wide variety of colors and patterns. I imagine it's similar to Tissue Tape, but don't know for sure. I'm planning on ordering some from the internet soon so I'll report back when I know more.
That's all for this post, hope it wasn't to sticky for you to wade through it all! Blessings!

1/27/11

Reflecting on Tim Holtz

Yes, ladies and Gents, it’s that  time of year again, Winter CHA is upon us. What that means for the average stamp-a-holic, is that all things new are being released to our Local Stamp Shops, who in turn will order great gobs of goodies for you and I to own! I love how Tim Holtz previews all of his new products on his Blog,  here we can see, hear and ALMOST TOUCH the new treasures that will soon await us. Now is the time to advise your stamp shop proprietor of what you can’t live without.
I’m jonesing for the Core’dinations  card stock which match the Distress Ink Colors! Conveniently packaged with one each per set of Tim’s 36 colors of Distress Ink. Secondly, Tim has a new Adirondack Cardstock made for specifically for Alcohol Inks, gotta get that too.  And Santa, I also put the Mini Rosette die and new tissue tape on my wish list too.
Tim is our artsy hero. He thinks of everything we wished we had thought of and creates it for us. He never ceases to take things just one more step beyond cool, which makes it fun for his many aficionado’s. On Saturday,  I’m facilitating a monthly project at Stamp Therapy for our Altered Art Group which is inspired by Tim’s Creative Blocks.  Having not taken his class, I came up with my own version of the project,  using of all things; a shoe box lid and foam core board. I later learned that he actually used canvases for his Creative Blocks, but ours is inspired by his and will of course be different. I’ve decided to share the process with you in case you’re interested. I'm calling my version:

A Tattered Journey

What I did:
I located a shoe box with a narrow depth lid. I chose one from a pair of ladies shoes, pretty average sized shoe box. No rules, use the size you like.
Using a screw-type hole punch, I punched two holes in the back of the lid about 1 ½” from the top and spaced about an 1 ½” from each side. I inserted a sturdy wire, which I then looped and twisted on the inside so the wire stayed in place. I then taped the loop down.  This creates a hanger.
I used a stapler to reinforce the box lid sides.
I cut two sheets of ¼” thick foam core board the same size as the inside of the box lid. I secured the first one with red tape to make sure it stuck to the wire firmly. The second layer I glued in with Tacky glue.

I created a template with a sheet of card stock to help me decide what size to cut the blocks. 

I then scored the template using my score pal and cut out the different sized block templates. 
Cut approx 1/16” off of each top and bottom of your templates in order to save room for the thickness of  the papers you will use to wrap your blocks. You can arrange your blocks in whatever way seems visually pleasing to you. I labeled each template with a letter so when cutting the foam core board to match I knew where each was to go. 

Then, using each template, I cut foam core board with an Exacto Knife and a steel ruler on a self-healing mat to match each template. I cut two for every size, and three for a couple  that I wanted to stand out. 


Each set of matching Foam core blocks were wrapped with tape to hold the bundle together. 


I laid out the blocks to make sure they would fit inside the shoe box lid.


I then began covering the bundles with papers, similar to wrapping a gift and securing ends with sturdy tape. 


Once all the bundles were covered with papers, I used Tissue Tape to cover the outer edge of the box lid, making sure to overlap the tape and cover the first 1/4" of the inside rim. It took two widths of tape to cover the edges that would be seen.
I then used red tape around the inner perimeter of the lid, and glued each bundle in with Tacky Glue, making sure that the lid was tight and firm to the bundle edge.

Now it's time to embellish.
I used a couple of rubber stamps; purchased ephemera including a clock face, medallion, Tattered Angels Glimmer Chips and Key; Tim Holtz Ideology gears, stickers, memo pins, keyholes, German Scrap, mini canvas altered with 7 Gypsies Gaffer Tape, Jenni Bowlin Butterfly and some old costume jewelry. Whenever possible, I distressed with Tim Holtz Distress ink. Let me know what you think!